You need to replace chimney flashing when it shows signs of deterioration that can compromise its ability to keep water out. Rust, warping and large cracks are all signs of major damage that can’t be repaired. Learn how to repair chimney flashing and keep your home and chimneys safe. Find out the best practices for flashing installation around your chimney to prevent further damage and protect vulnerable areas.
What is Chimney Flashing?
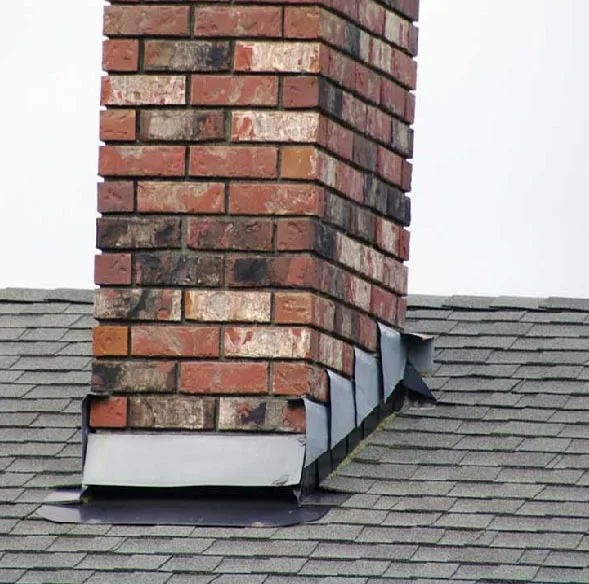
Chimney flashing is a type of roof flashing that creates a waterproof seal between your chimney and roof. When installed correctly, chimney flashing can last up to 30 years depending on material, climate and maintenance. It’s made up of three main components: Step Flashing which is installed along the roofing shingles to divert water away from the chimney; Counter Flashing which covers the chimney’s brickwork and overlaps step flashing to prevent leaks; and Base Flashing which wraps around the chimney base, often nailed to the roof to block leaks at vulnerable points. Flashing materials are vinyl, aluminum, copper and galvanized steel, with copper and galvanized steel being popular in areas prone to severe weather.
Types of Chimney Flashing Materials
Choose the right flashing material for durability and weather resistance. Aluminum is light and durable but may need occasional maintenance. Copper is a premium option, long lasting and weather resistant, great for harsh climates. Lead flashing is easy to install but toxic if weathered improperly, Vinyl or PVC flashing is budget friendly to install but lacks the weathering capabilities of metal based flashing though it’s not suitable for extreme weather. Galvanized steel or sheet metal is what contractors use to create custom flashing for corners and chimney joints. Each has its own benefits so the best choice depends on climate and roof type.
7 Steps to Inspect and Replace Chimney Flashing
If you have a chimney leak its probably time to replace rather than repair the existing chimney. Here’s a 7-step quick guide:
- Inspect Flashing: Look for rust, gaps or looseness along the top edge of the existing metal flashing.
- Remove Old Flashing: Use tin snips or a pry bar to remove the old flashing pieces, then clean the area. Old roofing cement should be removed before installing new flashing to ensure a flat roofing surface.
- Measure Roof Slope: Get the roof slope right.
- Cut New Flashing: Cut continuous flashing or base flashing around the brick chimney step by step.
- Attach Flashing: Hammer and nail base flashing, layer it with surrounding shingles. Corner flashing is key to keep water out. Base flashing is installed under the shingles and bent in an L-shape against the chimney.
- Install Cap Flashing: Groove the chimney brickwork, embed cap flashing in the corner mortar joints and secure with masonry anchors.
- Caulk: Caulk around edges to seal it up tight.
For the best results hire a chimney professional for the chimney flashing installation and maintenance.
Ensuring Effective Chimney Flashing Installation
Proper installation and maintenance of chimney flashing is key to preventing leaks and structural issues. Using the wrong materials for your roof type and climate will compromise flashing. Old nails and hardened roofing cement should be removed to ensure the flashing lies flat on the chimney. Flashing should never lap over the flow of water. When installing flashing it should extend 6 inches at the bottom and 9 to 12 inches at the top. Loose flashing will move when you touch it and will tell you it needs repair or replacement. Counter flashing is bent down over the base flashing and embedded into a chimney mortar joint. Remember, Counter flashing is to cover the step flashing and embed it into the chimney’s brickwork. Every few years reapplying roofing cement to any visible seams or cracks to reseal them and keep the vertical surface of the flashing watertight.
Importance of Regular Chimney Inspection
Regular inspections of chimney flashing will catch problems before they become major. Look for loose seams which allow moisture to get in and cause wood rot or drywall damage and any signs of rust or cracks in the attic flashing or roofing cement. Clean debris like leaves and dirt from the roof and flashing regularly to prevent water from pooling and reduce the risk of leaks. After severe weather events inspect the flashing as heavy rain or snow can cause damage which if left unchecked can cause big problems. Check your attic for water stains on rafters or ceilings to see if there are hidden leaks from roof flashing. If roof access is tough, consider calling a professional chimney flashing service. An annual inspection is highly recommended by GMT Home Services, for keeping your chimney and home safe from structural damages.
Prevention of Future Leaks and Damage
Future leaks and damage will be prevented with a regular maintenance schedule. Do an annual inspection to check for rust, gaps or holes in the flashing. Keep the area around the chimney and flashing clear of debris so water can flow off the roof. Use roofing cement to seal small cracks or gaps in lead flashing that appear and consider installing a chimney cap to prevent water from getting into the chimney. Using the wrong materials for your roof and wrong layering of the flashing around and where the roof meets vertical surfaces will allow water in. And not doing regular inspections is a big mistake; these regular checks will catch small problems before they become big repairs.
Safety Considerations for Flashing Replacement
Preventive maintenance is key to extending the life of your chimney flashing and roof leaks. Replacing chimney flashing can be dangerous especially on steep roofs so be safe. Wear protective gear, gloves, safety goggles and a harness and make sure your ladder is stable and have someone to hold it for you if needed. Don’t work in bad weather, wet or windy weather will increase the risk of accidents. If heights or flashing replacement is daunting, consider hiring a professional to do it for you. Regular chimney and roof flashing and maintenance and timely repairs or replacement will save your home from water damage and extend the life of your chimney and roof.
FAQS
1. What does flashing do on a chimney?
Flashing seals the chimney to the roof to prevent leaks.
2. Do chimney flashings go over or under shingles?
Step flashing goes under shingles, counter flashing goes over.
3. Where does chimney flashing leak?
Chimney flashing leaks at loose seams, gaps or where the roofing cement is damaged.
4. Should chimney flashing be sealed?
Yes, chimney flashing should be sealed on seams to prevent water infiltration.
5. What are chimney flashings?
Chimney flashings are waterproof material, metal sheets that seal the junction between chimney and roof.
6. Does chimney flashing go under or over shingles?
Flashing goes under and over shingles depending on type.