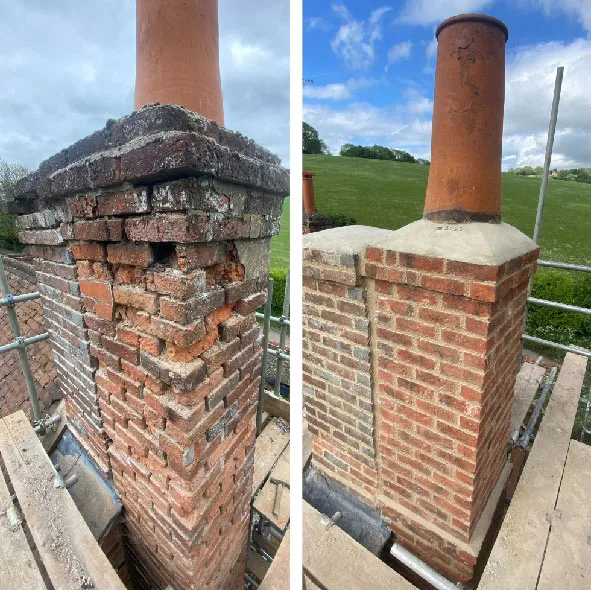
Over time, moisture, thermal movement, and harsh weather can cause mortar joints in a brick chimney to deteriorate. Repointing Chimney is the process of removing old mortar joints and replacing them with new mortar to restore structural integrity and prevent water damage. Unlike tuckpointing, which is cosmetic, repointing a chimney is essential for the functionality and safety of the structure. If neglected masonry joints are left unmaintained, you could be looking at chimney rebuilding or even a full rebuild of the exterior masonry.
Before You Repoint a Chimney
Before you start repointing a chimney, you need to inspect it. Look for signs of deterioration, such as loose mortar, cracks, spalling, or water damage on the surrounding brick. Repointing is a time-consuming process that requires patience and precision,, so using the right tools is key. You will need a plugging chisel, hammer, tuck pointer, pointing tools, spray bottle, wire brush, and mortar mixer. Wear protective gear to avoid falling debris and dust inhalation.
Remove Old Mortar
The first step in repointing a chimney is removing the old mortar from the damaged joints. Use a plugging chisel and hammer to chip away the old mortar to a depth of 1-2 inches. Be careful not to damage the surrounding brickwork, as older bricks can be fragile. Use a wire brush or compressed air to clear out any remaining dust and debris so the new mortar can bond properly.
Mix and Apply
You need to choose the right mortar. For masonry repairs on an old brick chimney, a lime mortar mix of lime putty, sand, and water is often recommended, as it allows for more flexibility and breathability. Newer masonry structures may require a cement-based mortar. Follow a step-by-step guide to mix the mortar, gradually adding water until you get the right consistency. Use a spray bottle to mist the cleaned joints lightly so the new mortar bonds better.
Apply the new mortar with a tuck pointer and press it in small lifts into the joints. Fill the joints flush with the brick surface, using pointing tools to smooth out excess mortar for a uniform finish. Work in sections and let the mortar set before proceeding to the next.
Finishing and Curing
Once all joints are filled, use a brush to remove loose mortar and refine the surface. Curing is key to durability. Mist the repointed areas with water several times over a few days to prevent drying out and cracking. Don’t repoint in extreme weather conditions like heavy rain, snow, or winter cold, as this can prevent the mortar from setting properly.
Preventing Future Damage
Regular maintenance is key to prolonging the life of your masonry chimney. Schedule an annual chimney inspection to catch small cracks or areas that need repair before they get worse. Applying a breathable waterproofing sealant will help prevent water infiltration without trapping moisture inside. Also, make sure the flue is in good condition and install a chimney cap to prevent weather-related deterioration.
DIY vs. Hiring a Pro
While some homeowners may attempt to repoint a chimney, it’s often best left to the pros. Chimney professionals have the knowledge to assess the damage, choose the right mortar, and make the masonry repairs. Improper repointing can lead to weak joints, more structural issues, and costly future chimney repairs. If the damage is extensive or a full rebuild is needed, hiring a pro is worth it.
FAQs
Q. What type of mortar do you use
The type of mortar used depends on the age and material of the chimney. Older brick chimneys need lime-based mortar for flexibility, and newer chimneys need cement-based mortar for durability.
Q. What’s the right mix for repointing a chimney?
For older chimneys 1 part lime putty to 3 parts sand is a common mix. For newer chimneys 1 part Portland cement, 1 part lime and 6 parts sand is a stronger bond.
Q. What kind of mortar to use?
Type N mortar (cement, lime and sand) is good for general chimney repointing, durable and flexible. Type O mortar (higher lime content) is best for historic or softer brick chimneys.
Q. Can you repoint a chimney yourself?
Yes, but repointing is a labor-intensive process that requires skill and the right tools. DIYers must remove old mortar, choose the right mix, and apply new mortar correctly, or risk damaging the brickwork. Hiring a pro will give you long-term results.
Q. How can I tell if my chimney needs repointing?
Signs include crumbling or missing mortar, loose bricks, cracks in the joints, white stains on bricks (efflorescence), water leaks, or mortar falling into the fireplace.
Q. Is it dangerous to repoint a chimney without proper inspection?
Yes. Hidden structural damage, loose bricks, or flue issues can make repointing unsafe and ineffective if not identified first.
Q. Is weather important before starting chimney repointing?
Yes. Avoid repointing during freezing temperatures, heavy rain, or extreme heat, as these conditions can prevent proper mortar curing.
Q. How deep should old mortar be removed?
Old mortar should be removed to a depth of 1 to 2 inches or until solid mortar is reached. This ensures a strong and long-lasting repair.
Q. What type of mortar should be used for chimney repointing?
The mortar type depends on the chimney’s age. Older chimneys need lime-based mortar for flexibility, while newer chimneys usually require cement-based mortar for strength.
Q. How much mortar is needed for chimney repointing?
The amount depends on joint depth, chimney size, and damage level. A professional assessment helps avoid over- or under-mixing.
Q. How long does mortar need to cure after repointing?
Mortar usually needs 3–7 days to cure properly, depending on weather conditions and mortar type.
Q. Can I use the fireplace immediately after repointing?
No. It’s best to wait at least 7–10 days before using the fireplace so the mortar can fully cure.
Q. How can I protect my chimney after repointing?
Regular inspections, installing a chimney cap, and applying a breathable waterproofing sealant help protect the chimney from moisture and weather damage.
Q. How often should a chimney be inspected to prevent damage?
Chimneys should be inspected once a year to catch small cracks, loose mortar, or moisture issues before they become serious problems.
Q. Can a chimney cap prevent future masonry damage?
Yes. A chimney cap keeps rain, snow, debris, and animals out, reducing moisture damage and extending the life of the chimney.
Q. Is chimney repointing dangerous for homeowners?
Yes. Working at heights, handling heavy tools, and dealing with falling debris make chimney repointing potentially dangerous without proper training.
Q. How much does professional chimney repointing usually cost?
Costs vary depending on chimney height, damage severity, and access, but professional repointing is far cheaper than a full chimney rebuild.
Q. How do I know if my chimney needs more than repointing?
If there are leaning sections, widespread brick damage, or deep cracks, a professional inspection may recommend partial or full rebuilding.
Q. Why is professional chimney repointing better than DIY?
Professionals can correctly assess structural damage, choose the proper mortar, ensure proper curing, and prevent future issues like leaks or brick failure.
Conclusion
Repointing your chimney is a maintenance task that saves the chimney’s structure and prevents house fires from compromising the masonry. By knowing the process, choosing the right materials, and performing regular maintenance, you can prevent fire risk, moisture infiltration, and costly repairs. Hire a GMT Home Services pro; maintaining a strong and weather-tight chimney is key to the life of your fireplace and roof.